Now first of all hello! I am back. I’ve been having a very intense and food-filled summer which I will explain in a separate post (this one is long enough already) although you may already know what I’m talking about if you follow me on instagram.
Whilst I have been workin hard, I’ve also been making the most of my flexible schedule by finally getting into sourdough. I’ve dabbled in the past but never made consistently good loaves until now. It’s definitely something which you need to practice, practice, practice to get right. I’m no expert on the matter and I’ve taken a few shortcuts in the original method (which my brother had taught me) for making sourdough but tbh it still looks cool and tastes awesome so that’s all that matters to me!
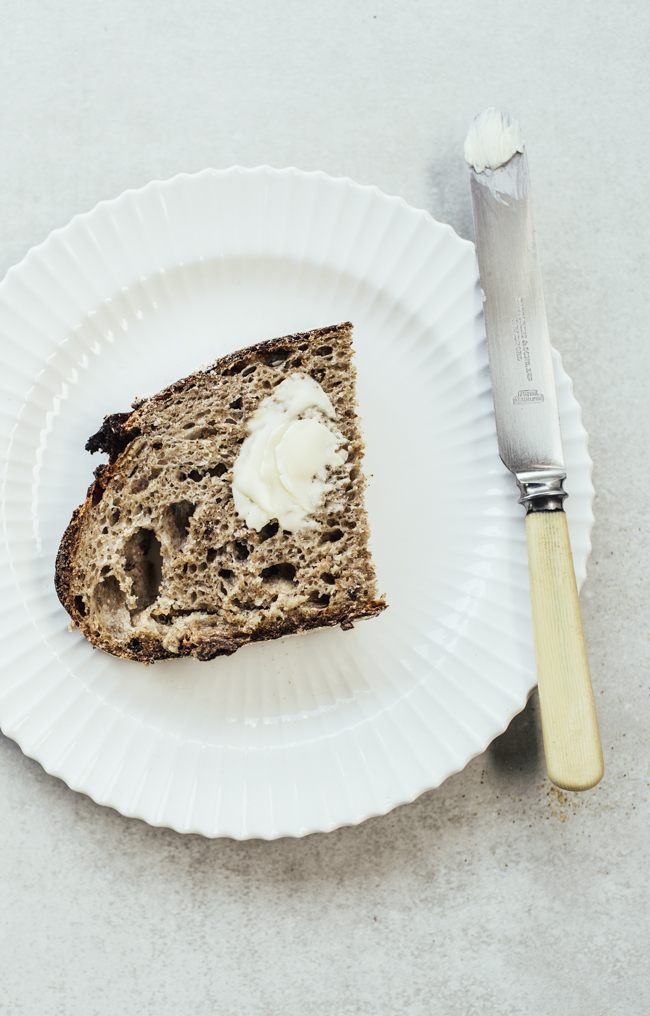
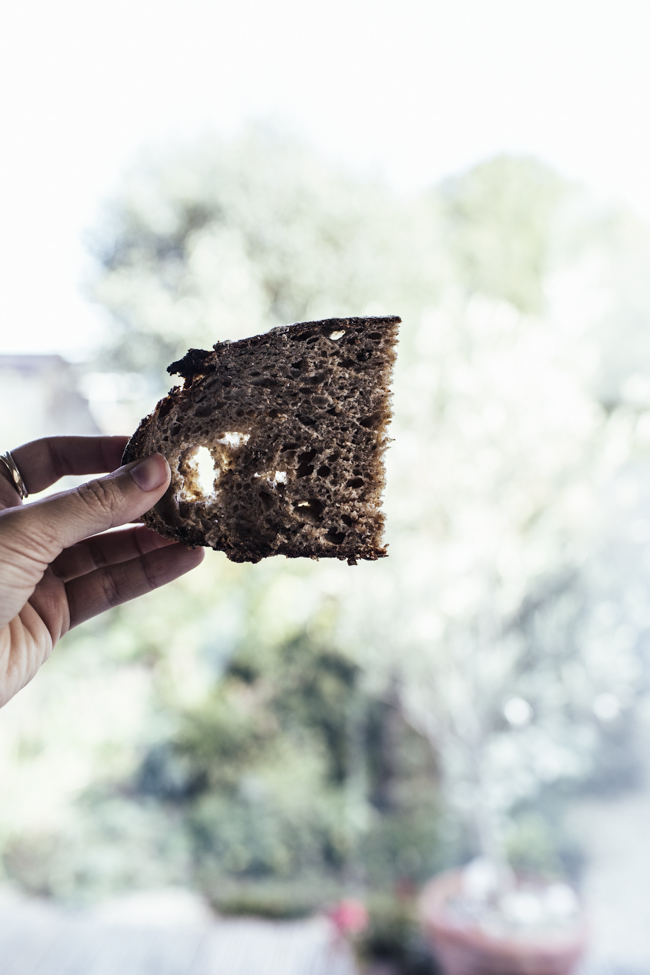
I also don’t ever manage to get super holey bread which I am actually more than fine with (more holey bread = more peanut butter ending up on my hands). Anyway I did an instagram story of my sourdough shenanigans last week and got a some people asking for the recipe in a written down format. So here we go – a .gif/picture guide to how I make my sourdough bread!
YOU WILL NEED:
- sourdough starter
- good quality bread flour (a.k.a. strong flour) – for the UK examples are Shipton Mill, Bacheldre, Carrs. This really does make a difference to the dough so make sure you get high quality stuff!
- salt
- water
- a set of digital kitchen scales
- a large mixing bowl
- cling film (plastic wrap)
- a banneton
- a bench scraper (you can make bread without one but they’re super useful when handling wet doughs)
- a lame, very sharp knife or razor blade
- a large dutch oven / lidded casserole dish. Mine is a ‘NACCO denmark blue, size 20E’. I bought it on ebay for £20 and it’s the perfect size!
PRE-AMBLE ABOUT SOURDOUGH:
How to make sourdough starter
If you haven’t got a sourdough starter yet, I have a comprehensive guide on starting and maintaining a sourdough starter right here.
My sourdough:
I mixed 50 g plain flour + 50 g water in a small bowl and left it out for 3 days covered with gauze. Each day I ‘fed’ the starter by mixing in 20g more flour and 20g more water. For these 3 days I didn’t throw any sourdough starter away.
After this time, it was smelling yeasty and getting some bubbles so I transferred it to a little jar which my mum made for me – it has a hole in the lid to let air in but I covered it with gauze too to stop the GODDAMN fruit flies from getting in. You can see the jar in the image in step 1!
For the next 2 weeks, I would discard half the starter and feed the starter each day (same as before with 20g of water + 20g of flour). It smelt nicely yeasty and was still bubbling away.
Now here’s where things get interesting – I put my sourdough starter into the fridge and forgot about it for over a week. When I remembered it and checked on it, there was a gross layer of liquid floating on top and the starter smelled vinegary rather than yeasty. I just poured off the excess liquid, discarded half the starter, fed it (20 g flour + 20 g water) and left it out overnight. The next day it looked happy and bubbly but still smelled vinegary. I baked a loaf of bread with it though and it was delish so I returned the starter to the fridge.
Now I keep my starter in the fridge and feed it once a week. I occasionally discard some starter so that the total volume of sourdough starter is only a few tablespoons in the jar.
When I want to make a loaf of bread I take the starter out the fridge 1-3 days before I’m going to start and I feed the starter every 12 hours (discarding the majority and feeding with equal weights of water & flour).
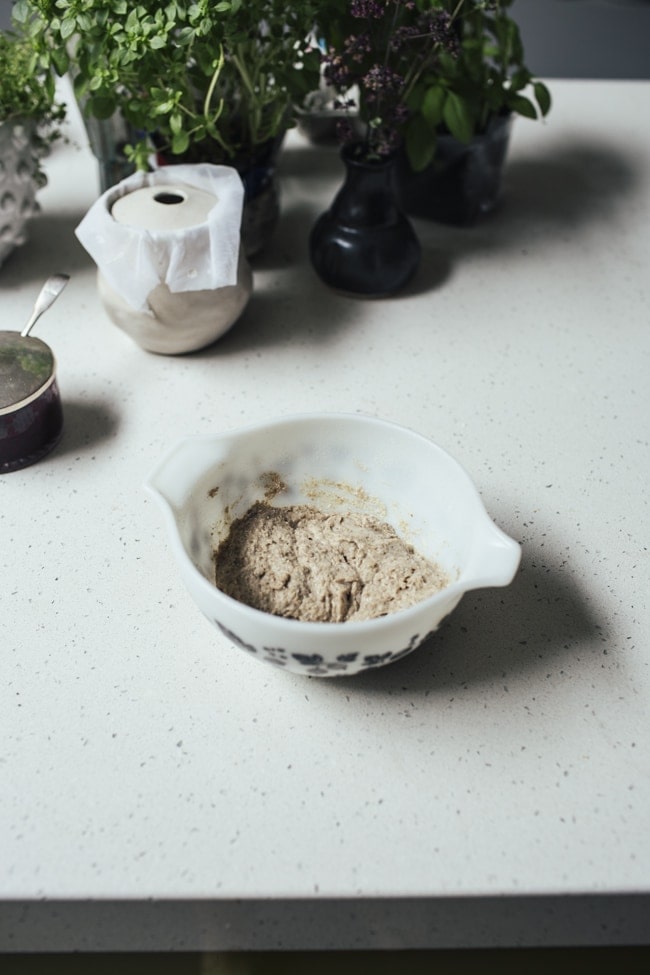
STEP 1: MAKE A LEVAIN —
time: 2 minutes (active time) + 8-12 hours (inactive time)
In a small bowl, combine:
- 1 tbsp sourdough starter, recently fed & at room temperature
- 50 g bread flour (I used dark rye flour here)
- 50 g lukewarm water (yep! weigh the water)
Mix until all the flour is incorporated. Cover the bowl with a piece of clingfilm and set it aside for 4-8 hours (depending on how warm the environment is).
It’ll look slightly bubbly and should have doubled in volume when it’s ready to go (you can place it into a clear container and mark the level of the levain with an elastic band just after mixing. This can help you tell more easily when it has doubled in volume). If you use plain flour rather than rye it may look considerably more liquidy than the photo above.
NB: If you have enough recently fed, 100% hydration starter you can use this instead of making a levain (you’ll need 110g of starter if you do this). No need to wait 4-8 hours, as long as it’s at its peak activity it’ll be fine to use straight away.
STEP 2: MIX THE DOUGH —
time = 5-10 minutes (active time) + 30 minutes (inactive time)
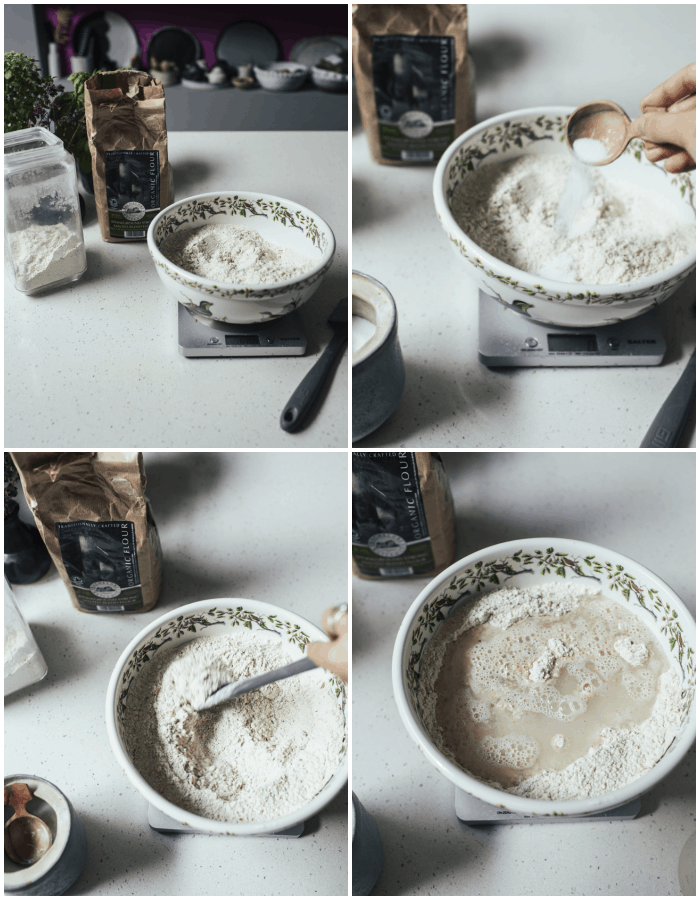
Scrape the bubbly levain into a larger bowl. To the larger bowl add:
- 500 g bread flour (strong flour) (I used all wholemeal wheat flour here which had some malted barley flakes in it too)
- 10 g salt
- 375 g lukewarm water (again, weight not volume)
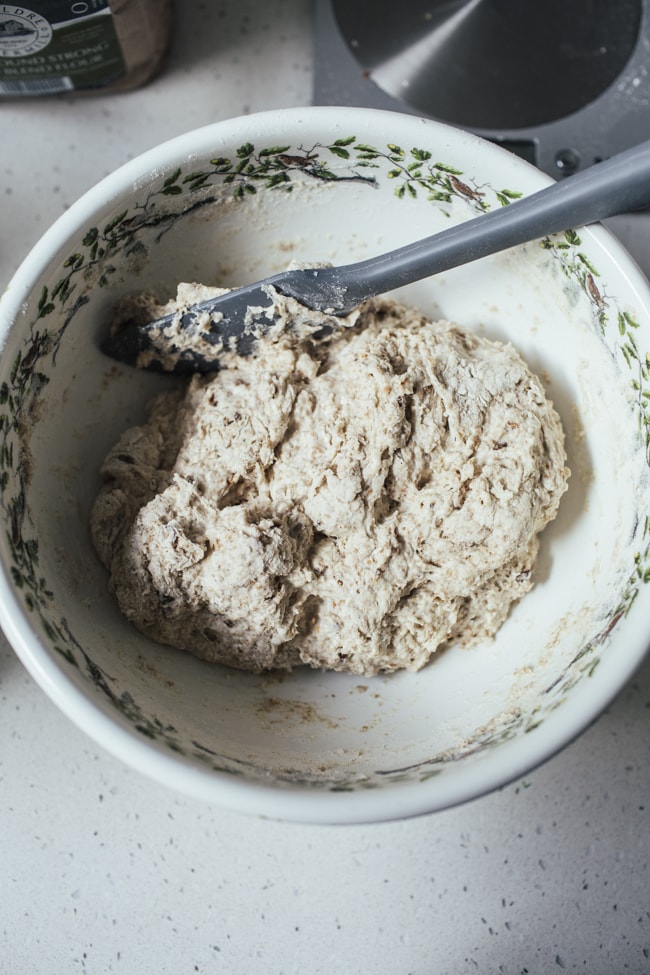
Mix together until the flour has just been incorporated. The dough will look quite ugly and lumpy at the moment! Cover the bowl with cling film and set it aside at room temperature for 30 minutes.
STEP 3: FOLD THE DOUGH —
time = 3 hours (relatively active time)
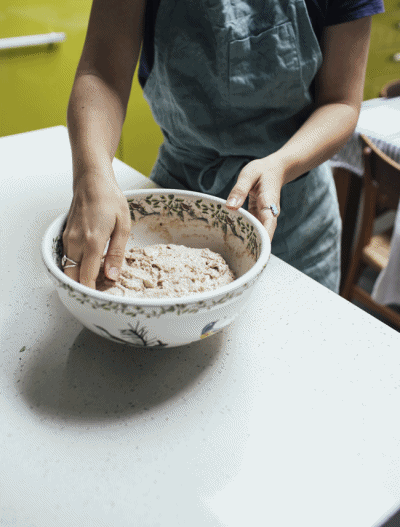
After your dough has rested for 30 minutes, uncover the dough
Rinse your hands with water and don’t dry them – having damp hands stops the dough from sticking so much!
With one of your damp hands, reach under the left side of the dough, grab the edge. Pull the edge up and fold it over to the opposite side of the dough. Repeat this with the right edge, top edge and bottom edge of the dough.
Scoop your hand under the whole piece of dough, lift it up and flip it over in the bowl. This is one ‘fold’.
Cover the bowl and let the dough rest for 30 minutes again.
Repeat this ‘folding’ of the dough followed by a 30 minute rest 5 more times (i.e. you’re doing one ‘fold’ every 30 minutes until you’ve folded it a total of 6 times over a period of 3 hours).
After the 6th fold is complete, let the dough rest for 30 minutes.
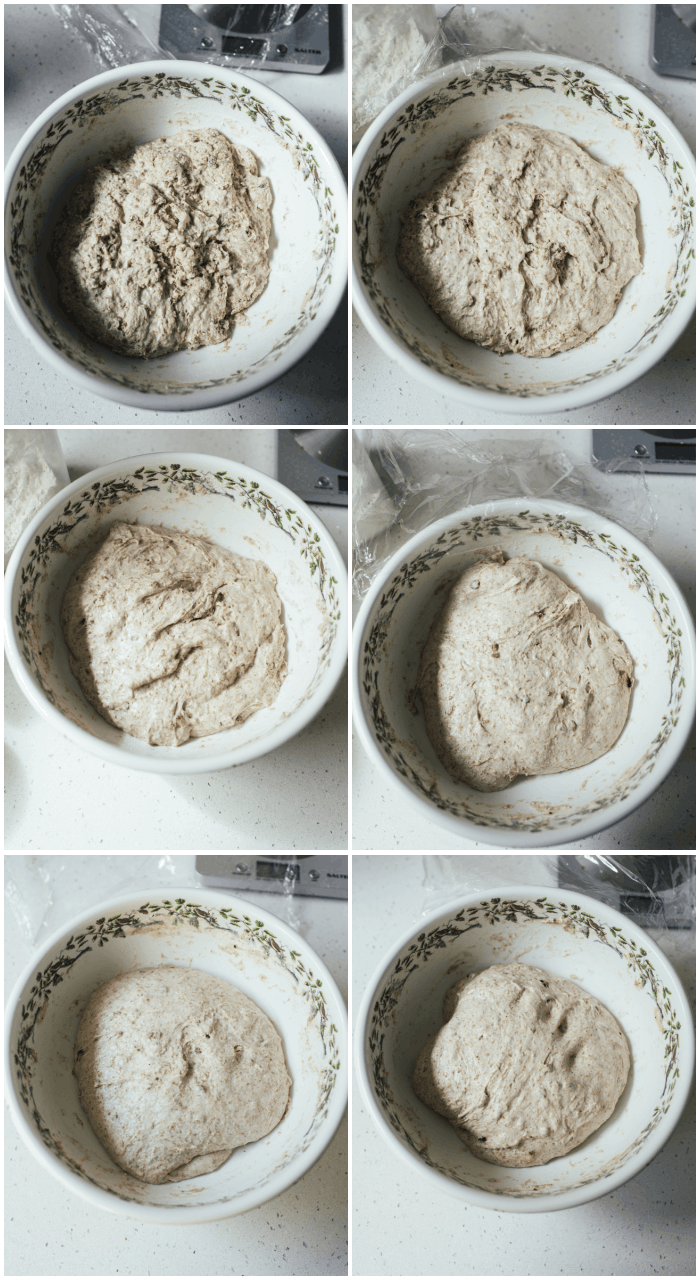
The images in the above photo grid show the dough after it has rested and just before I’m about to fold it at each 30 minute mark. You can see how, as time progresses and the folds increase, the dough gets smoother and tighter. Pretty cool!
STEP 4: PRE SHAPE —
time = 5-10 minutes (active time) + 30 minutes (inactive time)
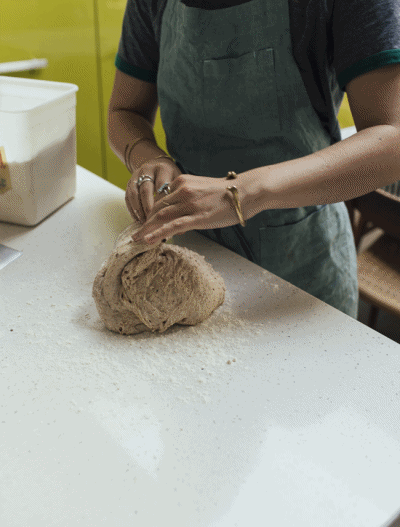
After that last 30 minute rest, scoop the dough out onto a lightly floured work surface.
Grasp an edge of the dough, stretch it out then up and into the middle of the dough. Work your way around the dough so that you form a rough ball then flip the dough over so all those edges are underneath and the smooth surface of the dough is facing upwards.
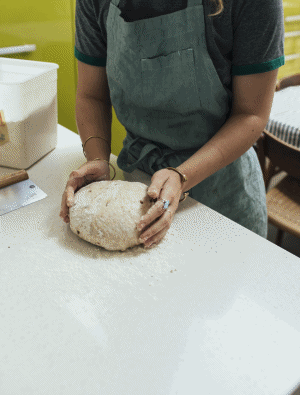
Dust the dough with a bit of flour. Cup your hands around the dough and rotate it (my preference is to rotate the dough anti-clockwise) whilst kind of trying to scoop your hands slightly under the dough each time. The aim here is to build up surface tension i.e. get a nice, taut dough ball. This is why it’s essential to not have too much flour on the work surface – you want the dough to kind of stick to the surface so that it helps pull the dough in. If there’s too much flour, the dough will just slide around and not get any tighter. You can also see my video below for the same shaping action.
Once the ball is pretty smooth, invert the mixing bowl you were using over it and let it rest for 30 minutes.
STEP 5: FINAL SHAPE —
time = 5-10 minutes (active time)
Now the dough has been pre-shaped and rested, it’s time for the final shape!
Use a bench scraper to flip the dough over. Repeat the same shaping method as before (stretching the edges of the dough into the centre, flipping it over and then cupping the dough whilst rotating it) to make the dough taut. Near the end of the video you’ll see me clear away the flour on the surface, plop the dough slightly further away from me and then drag it towards me with cupped hands – this also helps to build surface tension but I’m not sure of how easy others will find it to do. I learnt it from watching a youtube video, of course!
Use a bench scraper to lift the dough up, flip it over and place it into a floured banneton*.
*to flour a banneton I sprinkle a generous amount of flour in and use my hands to press and smooth it into the ridges. Don’t tap out excess as all the flour will just fall out of the ridges. I like to leave a nice layer of flour dusted over the base of the banneton as I’m always freaked out that it’ll stick there! ALSO – I don’t wash my banneton between uses, just tap out excess flour after I’ve tipped the dough out to bake. Store the banneton somewhere cool and dry.
STEP 6: RETARD THE DOUGH
time = 8-12 hours (inactive time)
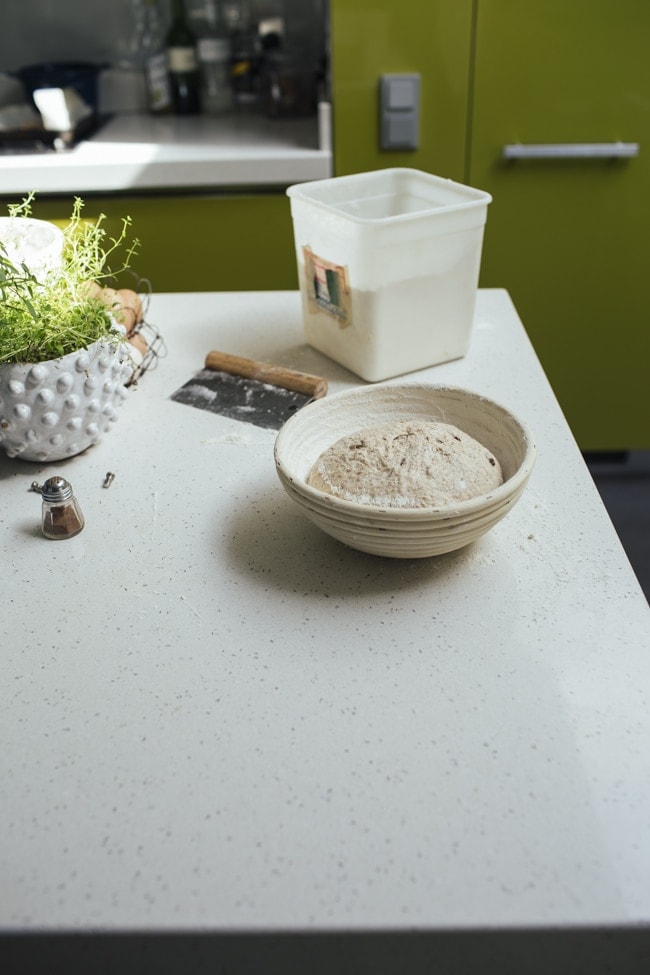
Place the banneton with the dough into the fridge for 8-12 hours (I usually do this overnight).
STEP 7: TIP, SLASH & PAR-BAKE WITH LID
time = 10 minutes (active time) + 1 hour 30 mins (inactive time)
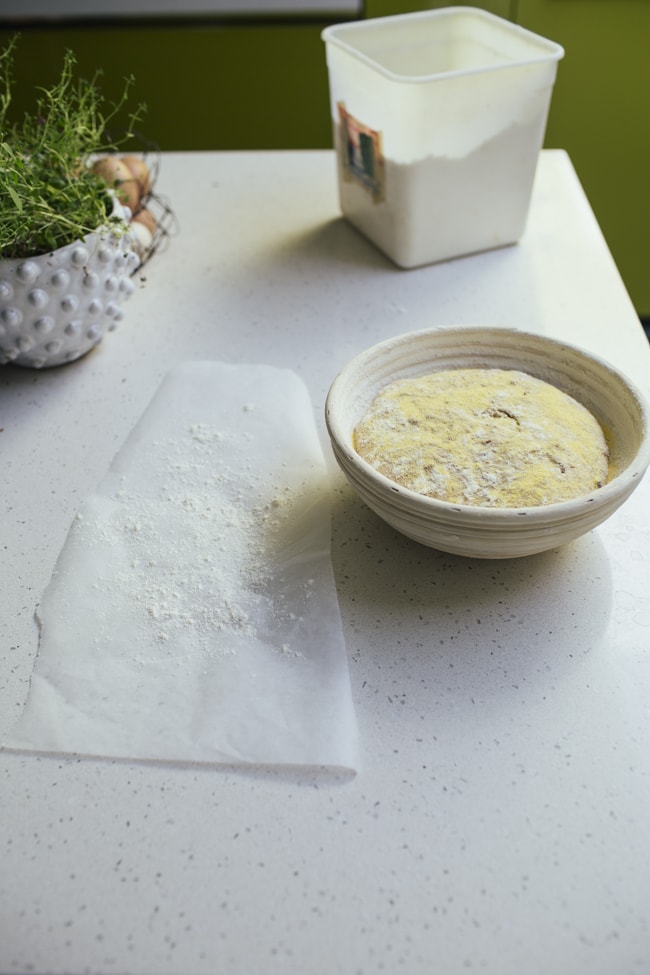
When ready to bake: preheat the oven to 250 C (480 F) with a dutch oven / lidded casserole dish inside and leave for 45 minutes so that the dutch oven/casserole dish gets VERY HOT! Meanwhile take the banneton out of the fridge, sprinkle the surface of the dough with cornmeal or flour and set it aside to come to room temperature. Cut a strip of baking paper, about as wide as the banneton, and dust it lightly with flour.
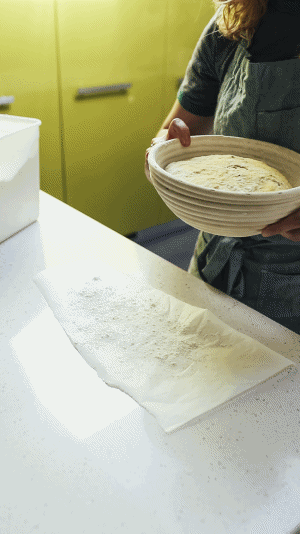
Once the dough has been sitting out for 45 minutes and the oven is preheated, tip the dough out onto the centre of the floured piece of baking paper.
Take the dutch oven/casserole dish out of the oven and set it down on a trivet/heatproof thing.
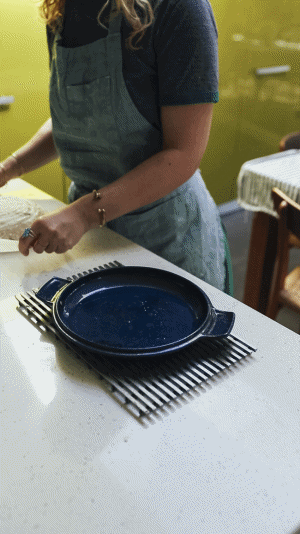
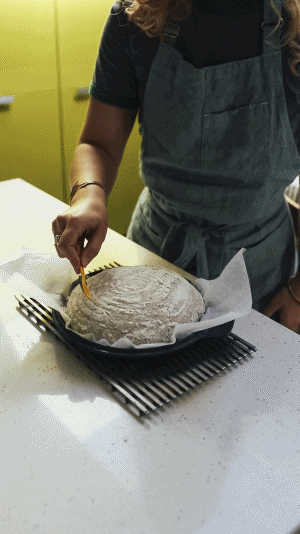
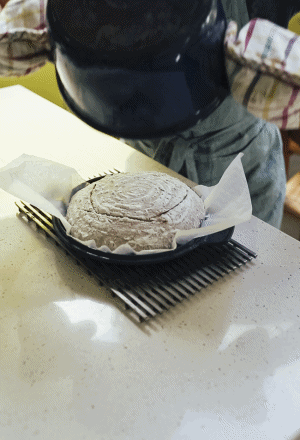
- If the lid of your dutch oven/casserole dish is flat then flip the lid upside down use that to place your dough onto (as in the .gif above) by lifting up the edges of the baking paper and lowering the bread + baking paper onto the lid. Swiftly slash the dough with a lame, razor blade or sharp knife (as in the .gif below). Make sure you only use the tip of the blade, not the whole edge of the blade, when slashing. You can do this in a square as I have here or do it in whatever pattern you want! Invert the base of the pot onto the lid.
- If your dutch oven/casserole has a handle on the lid so you can’t invert it: Swiftly slash the dough with a lame, razor blade or sharp knife (as in the .gif below). Make sure you only use the tip of the blade, not the whole edge of the blade, when slashing. You can do this in a square as I have here or do it in whatever pattern you want! Lift the edges of the baking paper up then gently, carefully and quickly lower the whole thing (baking paper and dough) into the pot and place the lid on.
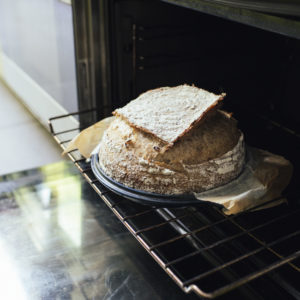
Once the dough is secured inside the hot dutch oven/casserole dish, lift the whole thing up and carefully slide it back into the oven. Bake for 30 minutes.
STEP 8: BAKE WITHOUT LID
time = 15-20 minutes (inactive time)
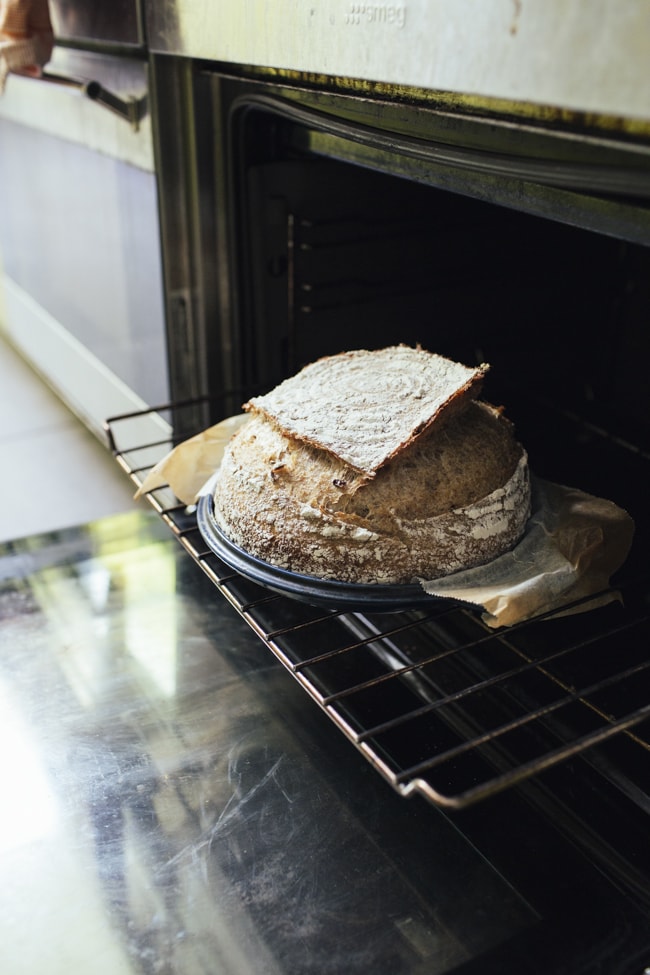
After the bread has been baking for 30 minutes inside the dutch oven/casserole dish, uncover it. Bake for a further 15-20 minutes uncovered until the bread is nicely darkened.
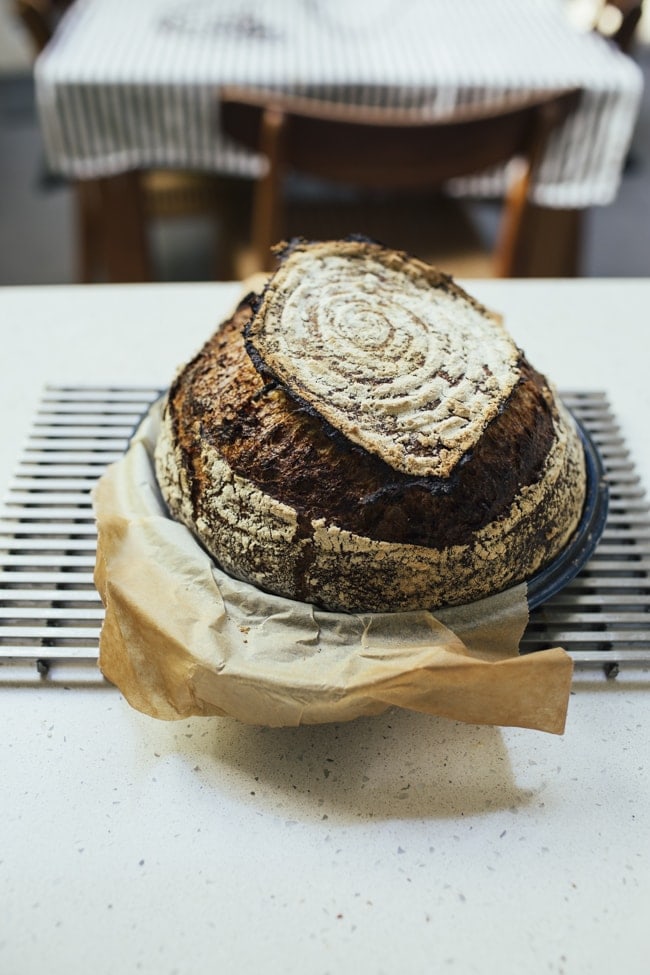
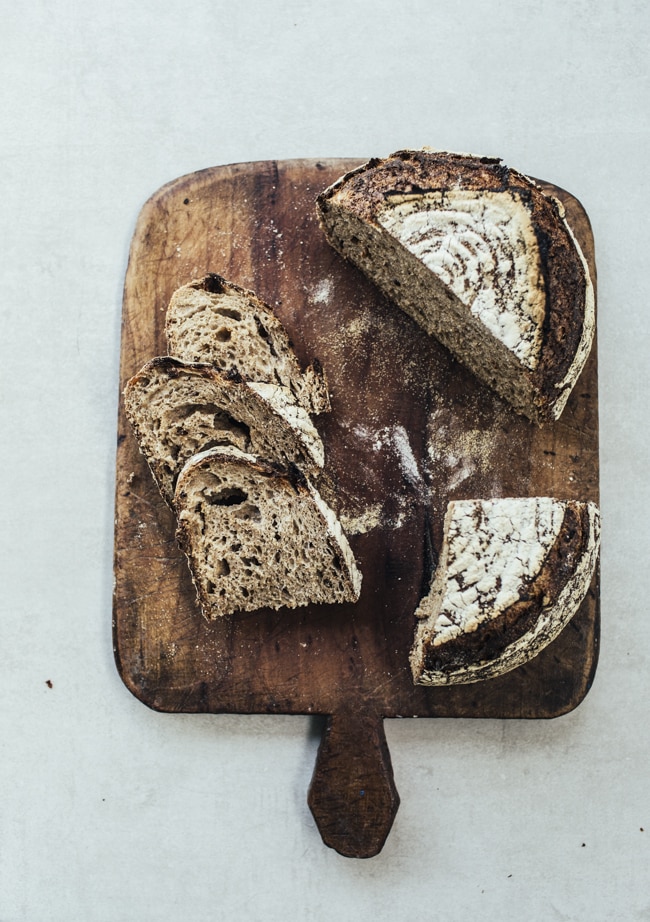
STEP 9: LET IT COOL THEN SLICE!
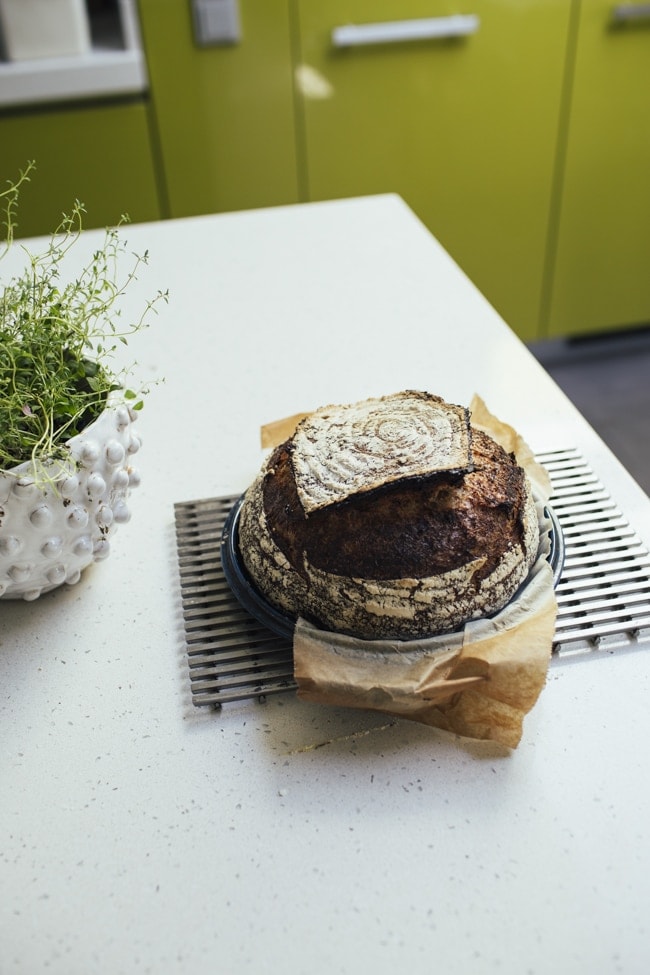
Let the bread cool for a few hours and then slice it. If you slice it whilst it’s hot it’ll be sticky, hard to slice and you’ll smush the dough #sadtimes. So, after you’ve put all this hard work into making the bread, give it a lil respect and do let it cool before cutting into it!
EXAMPLE TIMINGS OF HOW I MAKE BREAD:
- Friday night: take starter out of the fridge and feed it. Let it sit out overnight
- Saturday, 8 am: mix the levain (step 1). Cover it. Let it sit out all day.
- Saturday, 4 pm: mix the dough and let it rest (step 2)
- Saturday, 4.45 pm: spend the next 3 hours folding and resting the dough (step 3)
- Saturday, 7.45 pm: pre-shape the dough (step 4)
- Saturday, 8.15 pm: final shape and transfer to banneton (step 5). Place it into the fridge overnight.
- Sunday, 8.45 am: take the dough out of the fridge, turn the oven on with the dutch oven inside (step 6)
- Sunday, 9.30 am: tip the dough out onto baking paper, slash it & place into the dutch oven. Pre-bake (step 7)
- Sunday, 10 am: uncover the bread in the oven, bake for the final 15-20 minutes (step 8)
- Sunday, 10.15 am: take bread out of oven. Leave to cool.
This post contains affiliate links
How to make Wholemeal Sourdough Bread
Equipment
- dutch oven or lidded casserole pot preferably with a flat lid but it can have a handle on the top
Ingredients
Levain:
- 1 tbsp sourdough starter 100% hydration, recently fed
- 50 g bread flour I used dark rye flour
- 50 g lukewarm water
The dough:
- 500 g strong wholemeal bread flour
- 375 g lukewarm water
- 10 g fine table salt
Instructions
NB: Please see blog post above this recipe card for detailed pictures/GIFs/videos on how to do these steps
For the levain:
- In a medium bowl, combine the sourdough, bread flour and water. Mix until all the flour is incorporated.1 tbsp sourdough starter, 50 g bread flour, 50 g lukewarm water
- Cover the bowl with a piece of clingfilm (or a shower cap/damp towel/ bowl cover) and set it aside for 4-8 hours (depending on how warm the environment is). It’ll look bubbly and should have doubled in volume when it’s ready to go.
Mix the dough:
- Scrape the bubbly levain into a larger bowl. To the larger bowl add the flour, water and salt. Mix together until the flour has just been incorporated. The dough will look quite ugly and lumpy at the moment! Cover the bowl with cling film and set it aside at room temperature for 30 minutes.500 g strong wholemeal bread flour, 375 g lukewarm water, 10 g fine table salt
Fold the dough (see gifs in post above for help):
- After your dough has rested for 30 minutes, uncover. Rinse your hands with water and don’t dry them – having damp hands stops the dough from sticking! With one of your damp hands, reach under the left side of the dough, grab the edge. Pull the edge up and fold it over to the opposite side of the dough. Repeat this with the right edge, top edge and bottom edge of the dough. Scoop your hand under the whole piece of dough, lift it up and flip it over in the bowl. This is one ‘fold’. See the GIFs in the post above for a visual explanation.
- Cover the bowl with cling film and let the dough rest for 30 minutes again.
- Repeat this ‘folding’ of the dough followed by a 30 minute rest 5 more times (i.e. you’re doing one ‘fold’ every 30 minutes until you’ve folded it a total of 6 times over a period of 3 hours).
- After the 6th fold is complete, let the dough rest for 30 minutes.
Pre shape (see gifs in post above for help):
- After that last 30 minute rest, scoop the dough out onto a lightly floured work surface.
- Grasp an edge of the dough, stretch it out then up and into the middle of the dough. Work your way around the dough so that you form a rough ball then flip the dough over so all those edges are underneath and the smooth surface of the dough is facing upwards.
- Dust the dough with a bit of flour. Cup your hands around the dough and rotate it (my preference is to rotate the dough anti-clockwise) whilst kind of trying to scoop your hands slightly under the dough each time. The aim here is to build up surface tension i.e. get a nice, taut dough ball. This is why it’s essential to not have too much flour on the work surface – you want the dough to kind of stick to the surface so that it helps pull the dough in. If there’s too much flour, the dough will just slide around and not get any tighter. You can also see my video in the post above for the same shaping action.
- Once the ball is pretty smooth, invert the mixing bowl you were using over it and let it rest for 30 minutes.
Final Shape:
- Use a bench scraper to flip the dough over. Repeat the same shaping method as before (stretching the edges of the dough into the centre, flipping it over and then cupping the dough whilst rotating it) to make the dough taut. Near the end of the video (in the post above) you’ll see me clear away the flour on the surface, plop the dough slightly further away from me and then drag it towards me with cupped hands – this also helps to build surface tension but I’m not sure of how easy others will find it to do. I learnt it from watching a youtube video, of course!
- Use a bench scraper to lift the dough up, flip it over and place it into a floured banneton*.
Retard the dough:
- Place the banneton with the dough into the fridge for 8-12 hours (I usually do this overnight).
Flip, score & par-bake:
- When ready to bake: preheat the oven to 250 C (480 F) with a dutch oven / lidded casserole dish inside and leave for 45 minutes so that the dutch oven/casserole dish gets VERY HOT!
- Meanwhile take the banneton out of the fridge, sprinkle the surface of the dough with cornmeal or flour and set it aside to come to room temperature. Cut a strip of baking paper, about as wide as the banneton, and dust it lightly with flour.
- Once the dough has been sitting out for 45 minutes and the oven is preheated, tip the dough out onto the centre of the floured piece of baking paper.
- Take the dutch oven/casserole dish out of the oven and set it down on a trivet/heatproof thing.
- If the lid of your dutch oven/casserole dish is flat then flip the lid upside down use that to place your dough onto (as in the .gif in the post above) by lifting up the edges of the baking paper and lowering the bread + baking paper onto the lid. Swiftly slash the dough with a lame, razor blade or sharp knife (as in the .gif below). Make sure you only use the tip of the blade, not the whole edge of the blade, when slashing. You can do this in a square as I have here or do it in whatever pattern you want! Invert the base of the pot onto the lid.
- If your dutch oven/casserole has a handle on the lid so you can’t invert it: Swiftly slash the dough with a lame (as described above). Lift the edges of the baking paper up then gently, carefully and quickly lower the whole thing (baking paper and dough) into the pot and place the lid on.
- Once the dough is secured inside the hot dutch oven/casserole dish, lift the whole thing up and carefully slide it into the oven. Bake for 30 minutes.
Bake without lid:
- After the bread has been baking for 30 minutes inside the dutch oven/casserole dish, carefully uncover it. Bake for a further 15-20 minutes uncovered until the bread is nicely darkened.
Let cool then slice:
- Let the bread cool for a few hours and then slice it. If you slice it whilst it’s hot it’ll be sticky, hard to slice and you’ll smush the dough #sadtimes. So, after you’ve put all this hard work into making the bread, give it a lil respect and do let it cool before cutting into it!
Notes
- Friday night: take starter out of the fridge and feed it. Let it sit out overnight
- Saturday, 8 am: mix the levain (step 1). Cover it. Let it sit out all day.
- Saturday, 4 pm: mix the dough and let it rest (step 2)
- Saturday, 4.45 pm: spend the next 3 hours folding and resting the dough (step 3)
- Saturday, 7.45 pm: pre-shape the dough (step 4)
- Saturday, 8.15 pm: final shape and transfer to banneton (step 5). Place it into the fridge overnight.
- Sunday, 8.45 am: take the dough out of the fridge, turn the oven on with the dutch oven inside (step 6)
- Sunday, 9.30 am: tip the dough out onto baking paper, slash it & place into the dutch oven. Pre-bake (step 7)
- Sunday, 10 am: uncover the bread in the oven, bake for the final 15-20 minutes (step 8)
- Sunday, 10.15 am: take bread out of oven. Leave to cool.
Such an informative post Izy, and probably the most comprehensive guide to make sourdough I’ve ever read. I will definitely be trying this out with your guide handy! Thanks for taking the time to write it! I look forward to reading your other post about what you’ve been up to, but I can tell from Instagram you’ve been busy!
Wonderful post Izy!!!
Your instructions are thorough and comprehensive.
Thanks for posting!
Whee, girl! Excited to read all about your flex-schedule adventures soon. As a San Franciscan, I totally endorse the idea of being able to make your own sourdough. Cheers for the guide!
Thank you, this is a great post, I will definitely try it out!
What does .GIF stand for?
Thanks for reading through!
.GIF is a file type – it stands for ‘graphics interchange format’. They’re the short, animated images that I’ve used in this post 🙂
This sounds great! Thanks for the recipe and such informative instructions! 🙂
Im so so pleased you’ve done this post! ive sort of been waiting for it cause i see your breads on instagram! thaanks it gonna be so useful and my flatmates are really going to benefit!! x
Fantastic post! I used the post to create a starter and then my first ever sourdough loaf, using a 50/50 mix of white and wholemeal and it worked perfectly first time!!! Thank you so much!