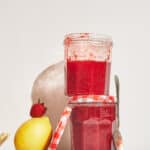
Strawberry Jam (no pectin)
A guide on how to make as lower sugar, homemade strawberry jam without needing jam sugar or additional pectin. All you need is strawberries, lemon and granulated sugar!
Servings 3 ~300g jars
Ingredients
- 600 g strawberries (fresh or frozen)
- 300 g granulated sugar
- ¼ lemon
- 3 to 4 tbsp lemon juice
Instructions
- If the berries are frozen, add to a large pot at room temperature. If fresh, hull and quarter the strawberries then add to a large pot. NB: Choose a pot which leaves you plenty of room above the berries; jam bubbles up as it cooks so you need some headroom to prevent it overflowing!600 g strawberries
- Add the sugar and wedge of lemon to the pot of strawberries. Stir together and leave to sit for at least 30 minutes (or even overnight in the fridge for the best result!)- you're looking for the berries to be swimming in juice and for all/most of the sugar to have been dissolved. This helps kick-start the jam-making process and gives you a really nice combo of juicy jam with fruity chunks in the finished product.300 g granulated sugar, 1/4 lemon
- Add the lemon juice (use more if you prefer a sharper jam) and mash the berries by hand, squishing them in the pot. Mash to the size that you'd like the fruit to be in the final jam. If you prefer a completely smooth jam, use a hand blender to blitz until smooth (careful to avoid blending the lemon wedge!).3 to 4 tbsp lemon juice
- Place a small plate in the freezer before you start cooking the jam, you'll use this for the 'wrinkle test' later.
- Sterilise your jars: Thoroughly clean your jam jars and lids inside and out with hot soapy water. Place the jars upside-down on a baking tray and into a 180°C oven to dry out (around 10-15 minutes). It's good to start this just before you make your jam so the jars are still hot when you add the jam!
- Cook the fruit over a medium heat on the stove, stirring often to prevent the jam catching and burning on the base of the pot. Foam will form on the surface at first - if you want to have a super clear jam at the end, skim this off and discard. Otherwise ignore the foam (I do!), it'll mostly subside but may make your jam slightly cloudy.
- After ~10-15 minutes, the foam will have subsided and the jam will look glossy with big shiny bubbles.
- The wrinkle test: to test if the jam is ready, take that small plate out of the freezer and place a small amount of jam onto it. Let it sit for ~10 seconds then push your finger through it. It should have a gently wrinkled appearance on its surface as you push your finger through (see pics in blog post below). It can be kind of subtle so you can also check if the jam runs together after you've pushed your finger through it - if a line remains, your jam is ready! If the line disappears and/or there's no wrinkle, keep cooking the jam for a few minutes longer and test again the same way.
- Once you're happy with the texture of the jam, remove the wedge of lemon then pour the hot jam into the hot jam jars, leaving about 1-2cm of headroom at the top of the jars. Screw on the lids and set upside-down on a baking tray to cool. Once cool, turn right side up and store somewhere cool and dark for up to 1 year.