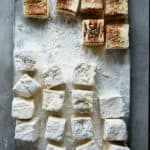
Vegan Marshmallows
Servings 12 -16 large square marshmallows
Ingredients
- 100 g aquafaba (chickpea water)
- 1 g (1/4 level tsp + 1/8 level tsp) xanthan gum
- 2 tsp vanilla extract
- 175 g water (yes, weigh it)
- 200 g granulated sugar
- 65 g golden syrup , corn syrup or liquid glucose
- 13 g (2 sachets) vege-gel (Dr. Oetker brand) (see notes for alternatives)
For dusting:
- icing sugar (powdered sugar)
- starch for dusting (I prefer potato starch, superfine white rice flour or glutinous rice flour as they work the best. Cornstarch also works but not as well).
Instructions
Read through all instructions and gather your ingredients + equipment before starting this recipe.
- Grease an 8 or 9-inch (20 or 23cm) square cake tin with a bit of vegetable oil. Line with baking paper and then brush the baking paper with a thin layer of vegetable oil too. Set aside.
- Place the aquafaba into the heatproof bowl of a stand mixer with the whisk attachment fitted. Sprinkle the xanthan gum over the surface of the aquafaba and then immediately start whisking the mixture on a high speed (if you let it sit around before whisking the xanthan may make clumps). Leave to beat until very thick and pale (similar to egg whites beaten to a stiff peak consistency). Once it reaches this thickness you can beat in the vanilla extract and then turn the mixer off.
- Meanwhile combine the granulated sugar, golden syrup (or glucose/corn syrup) and 75g of water in a large pot. Set aside.
- In a small bowl, place the vege-gel. Gradually pour in the remaining 100g of water whilst stirring with a whisk to get a smooth, slightly goopy mixture. Set aside.
- Place the large pot of sugar mixture on the stove on a medium-high heat. Stir constantly until the sugar has dissolved and then stop stirring but keep heating the mixture until it reaches 120°C (248°F). Take off the heat, pour in the goopy vege-gel mixture and quickly stir together (I like to use a small whisk for this step). Return to the heat and bring back up to 100°C (212°F).
- Immediately remove from the heat and, with the mixer running on a medium speed, pour the hot sugar mixture into the aquafaba foam in a steady stream. It should remain fluffy! Once you've poured it all in, increase the speed to maximum for a few seconds to make sure it's all mixed together. Stop the mixer and pour the marshmallow mixture straight into the prepared cake tin as fast as possible! This is very important as the mixture will start to set really quickly so if you don't get it into the pan it wont set flat. Try to spread it out into as even a layer as possible. You can also press a piece of oiled baking paper over the top of the marshmallows in the pan to help smooth it out if you need to.
- Leave to set for about 30-60 minutes.
- In a small bowl, mix equal volumes of icing sugar and your preferred starch (I like potato starch here the best). You'll probably need around 5 to 8 tablespoons of each.
- Dust a work surface with the icing sugar/starch mixture using a small seive/sifter. Gently flip the set marshmallows out onto this and peel away the baking paper. Dust the top of the marshmallows with more icing sugar/starch mixture. Use a sharp knife to cut the marshmallows into squares (you may need to wipe the blade occasionally to keep things neat). Roll each marshmallow in more starch to coat them all over.
- Line a baking tray with baking paper and then dust with a bit of the icing sugar/starch mixture. Place the marshmallows on the tray and allow to sit out, uncovered, at room temperature for around 12-24 hours. You'll notice a lot of the starch will have disappeared at this point and they'll be a bit tacky. Re-roll the marshmallows in icing sugar/starch and then return to the tray to let them 'cure' for a further 12-24 hours. Now you should be able to pop them into an airtight container or, as I prefer, leave them out uncovered at room temp as they'll develop more of a sugary crust to them.
- They should keep for about 2 weeks like this. You may find that if they're in a sealed container that they will need to be re-coated with starch but will become less sticky over time (even though they may appear 'shiny' and so you may think they're sticky, they won't be when you poke them).
Notes
1. When testing this recipe I used Dr. Oetker vege-gel which is a pre-blended mixture of carageenan and locust bean gum (carob gum). You can get this in the baking aisle in UK supermarkets (I got mine from Sainsbury's) and it comes in packs containing 3 sachets. I know not everyone will be able to access this so I tested the recipe with straight up carageenan and guar gum. So if you can't get vege-gel, you can use:
1 g (1/2 level tsp) carageenan
1g (1/4 level tsp + 1/8 level tsp) locust bean gum
Just mix them together and use as you would vege-gel in the recipe as usual.
If using volumes instead of weights, make sure you have accurate measuring spoons (I like these ones by OXO which I've tested the accuracy of with my micro scales).
I used THIS carageenan and THIS locust bean gum brand. I haven't tested with other brands which may have varying strengths so I can't say whether it will work first time with different brands. You may have to adjust the levels yourself after testing the recipe with your own ingredients if you have different ones to me.